Introduction to the HC-SR04 Ultrasonic Sensor.
The HC-SR04 is a popular ultrasonic distance sensor used in various electronics and robotics projects. It measures distance by emitting high-frequency sound waves and calculating the time it takes for the echo to return. This sensor is renowned for its affordability, ease of use, and accuracy in distance measurement.
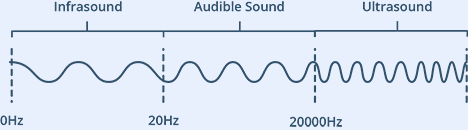
What is Ultrasound?
Ultrasound is a high-pitched sound wave whose frequency exceeds the audible range of human hearing.
Humans can hear sound waves that vibrate in the range of about 20 times a second (a deep rumbling noise) to 20,000 times a second (a high-pitched whistle). However, ultrasound has a frequency of more than 20,000 Hz and is therefore inaudible to humans.
How the HC-SR04 Works
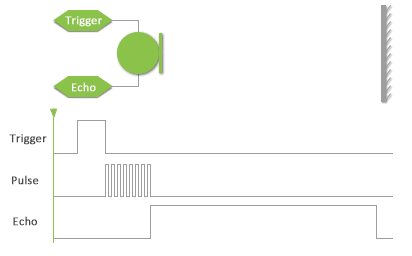
Ultrasonic Pulse Emission: The HC-SR04 emits a pulse of ultrasonic sound waves from its transmitter (TRIG pin) at a frequency of 40 kHz.
Echo Reception: These sound waves travel through the air and bounce off nearby objects. The reflected waves return to the sensor and are captured by the receiver (ECHO pin).
Time Measurement: The sensor calculates the time taken for the ultrasonic pulse to travel to the object and back. This time is used to compute the distance.
Distance Calculation: Using the speed of sound (approximately 343 meters per second in air), the sensor converts the time measurement into distance. The formula used is:
Distance=Time×Speed of Sound/2.
The division by 2 accounts for the round-trip travel of the sound waves.
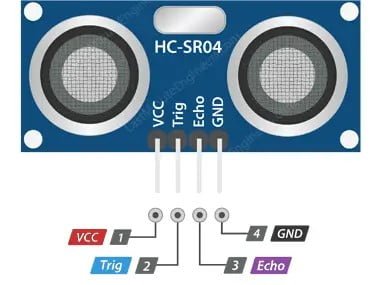
HC-SR04 Ultrasonic Sensor Pinout
Trig (Trigger) Pin: Used to initiate the ultrasonic pulse. Set this pin HIGH for 10µs to generate an ultrasonic burst that the sensor uses to measure distance.
Echo Pin: This pin goes HIGH when the ultrasonic pulse is transmitted and remains HIGH until the echo is received. By timing how long the Echo pin stays HIGH, you can calculate the distance to the object.
GND (Ground): Connect this pin to the Arduino’s ground to complete the circuit and provide a common reference point for the sensor.
Components Required:
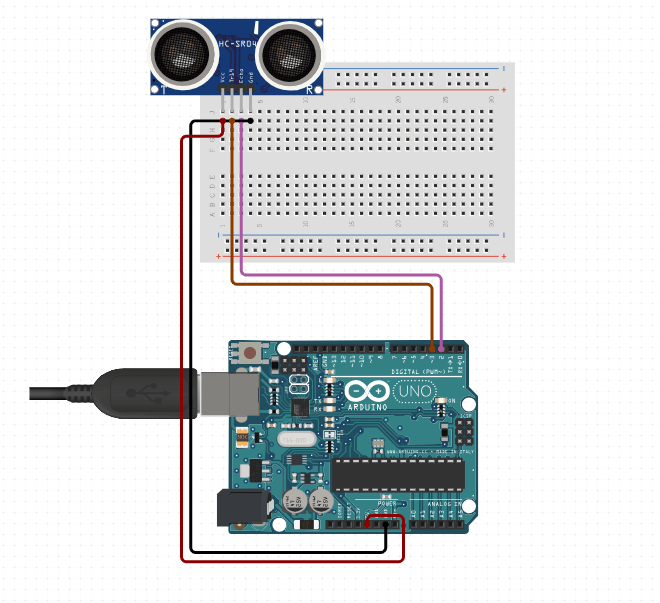
Wiring the HC-SR04 to Arduino:
Connect the VCC Pin: Connect the VCC pin of the HC-SR04 to the 5V pin on the Arduino.
Connect the GND Pin: Connect the GND pin of the HC-SR04 to the ground (GND) on the Arduino.
Connect the TRIG Pin: Connect the TRIG pin of the HC-SR04 to a digital output pin on the Arduino (e.g., pin 3).
Connect the ECHO Pin: Connect the ECHO pin of the HC-SR04 to a digital input pin on the Arduino (e.g., pin 2).
When you are done you should have something that looks similar to the image shown below.
Programming the Arduino:
Upload the following code to your Arduino to interface with the HC-SR04 and measure distance:
const int trigPin = 3;  // Pin connected to TRIG
const int echoPin = 2; // Pin connected to ECHO
void setup() {
  Serial.begin(9600);         // Start serial communication
  pinMode(trigPin, OUTPUT);   // Set TRIG pin as OUTPUT
  pinMode(echoPin, INPUT);    // Set ECHO pin as INPUT
}
void loop() {
  long duration;
  int distance;
  // Trigger the sensor
  digitalWrite(trigPin, LOW);
  delayMicroseconds(2);
  digitalWrite(trigPin, HIGH);
  delayMicroseconds(10);a
  digitalWrite(trigPin, LOW);
  // Measure the pulse duration
  duration = pulseIn(echoPin, HIGH);
  // Calculate the distance
  distance = duration * 0.0344 / 2;
  // Print the distance to the Serial Monitor
  Serial.print("Distance: ");
  Serial.print(distance);
  Serial.println(" cm");
  delay(500);
}
Explanation of the Code:
Setup: Initializes serial communication and sets the TRIG pin as an output and the ECHO pin as an input.
Loop: Sends a trigger pulse, measures the duration of the echo pulse, calculates the distance based on the time, and prints it to the Serial Monitor.
Advantages:
Affordable: The HC-SR04 is cost-effective, making it accessible for hobbyists and educators.
Easy to Use: Simple to interface with Arduino, requiring minimal code and straightforward wiring.
Accurate Measurements: Provides reliable distance measurements within a range of 2 cm to 400 cm.
Low Power Consumption: Suitable for battery-operated projects due to its low power requirements.
Versatile Applications: Ideal for various uses, including obstacle detection, distance measurement, and automated systems.
Widely Available: Commonly used and supported in many tutorials and libraries, making it easy to find resources and examples.
Disadvantages:
Limited Range: Effective only within a specific distance range (2 cm to 400 cm), which might not be suitable for all applications.
Environmental Sensitivity: Performance can be affected by environmental factors such as temperature, humidity, and surface material of the detected object.
Accuracy Issues: Precision can decrease with longer distances or if the object has an irregular shape or surface.
Interference: Ultrasonic waves may be disrupted by other ultrasonic sources or noise, affecting measurement accuracy.
Requires Line-of-Sight: The sensor needs a clear path for the ultrasonic waves to travel, limiting its use in obstructed environments.
Applications of the HC-SR04:
Obstacle Detection: Used in robots to avoid collisions.
Distance Measurement: Useful in various automation and measurement projects.
Parking Sensors: Applied in vehicles to assist with parking.
Conclusion
The HC-SR04 ultrasonic sensor is a versatile and effective tool for measuring distances and detecting obstacles. By following the above steps, you can easily interface the sensor with an Arduino to incorporate distance sensing capabilities into your projects. Whether you’re working on robotics, automation, or educational projects, the HC-SR04 offers a practical solution for accurate distance measurement.